How to build a Shopify product customizer with a live preview

Short answer
A Shopify product customizer with a live preview is a stack of images, one per choice, that sit exactly on top of each other on the product page and switch on and off as the shopper picks options. Infinite Options collects the choices and puts them on the order. It doesn't swap images on its own, but its JavaScript Events API tells your theme the moment a choice changes, and a short script can show the matching layer. This guide walks through the whole build using our raglan baseball shirt demo, where the sleeves, body color and jersey number all update as you choose them.
It's a project for someone comfortable editing theme code, or for a Shopify developer you hire. The code is short. The artwork is the hard part, so most of this article is about getting the images right.
What the demo does
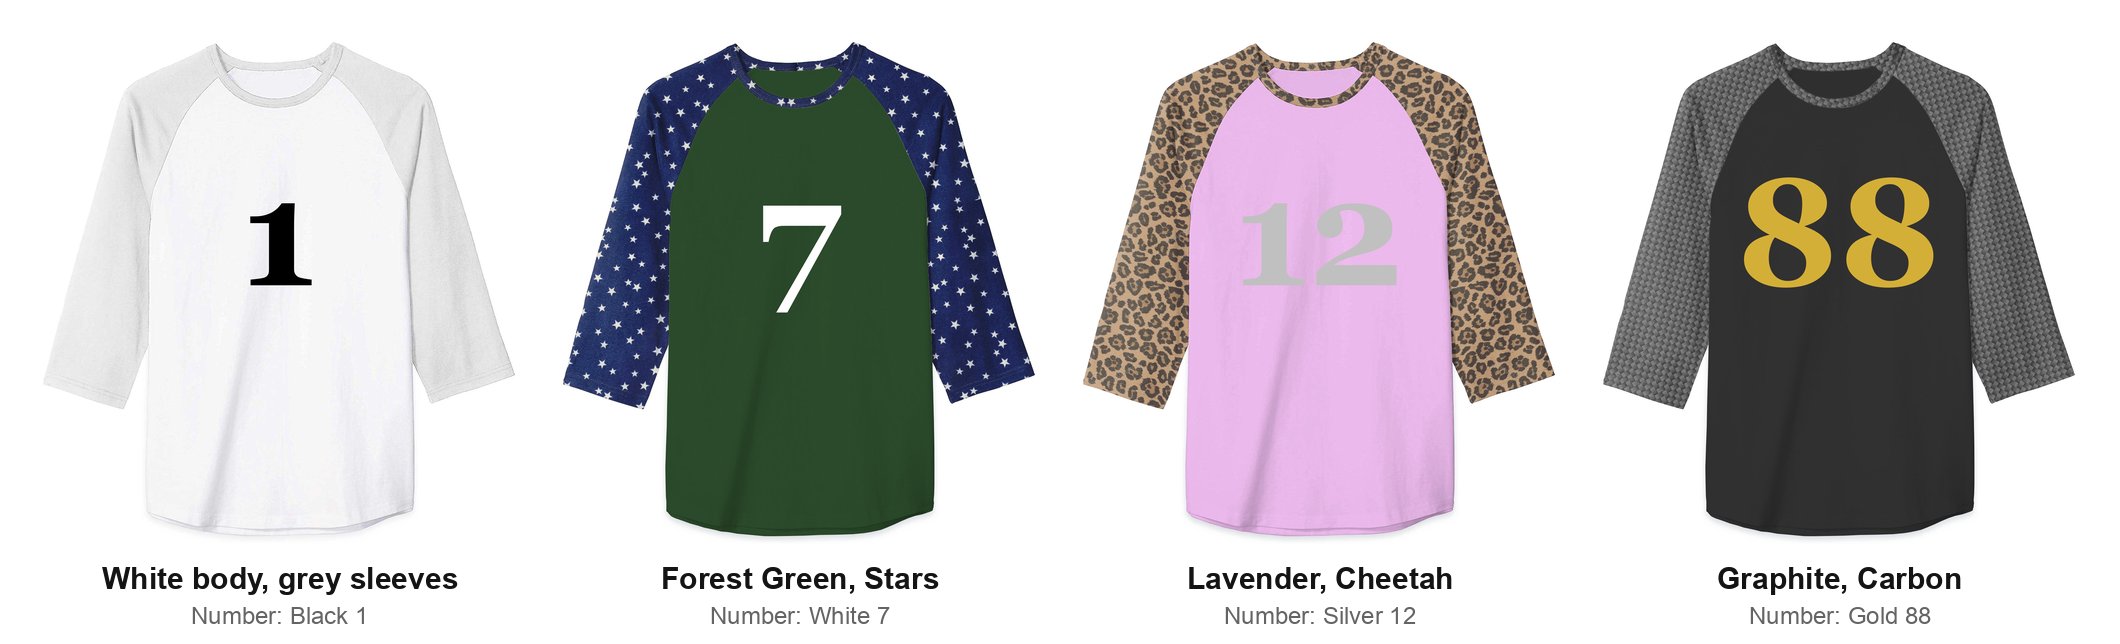
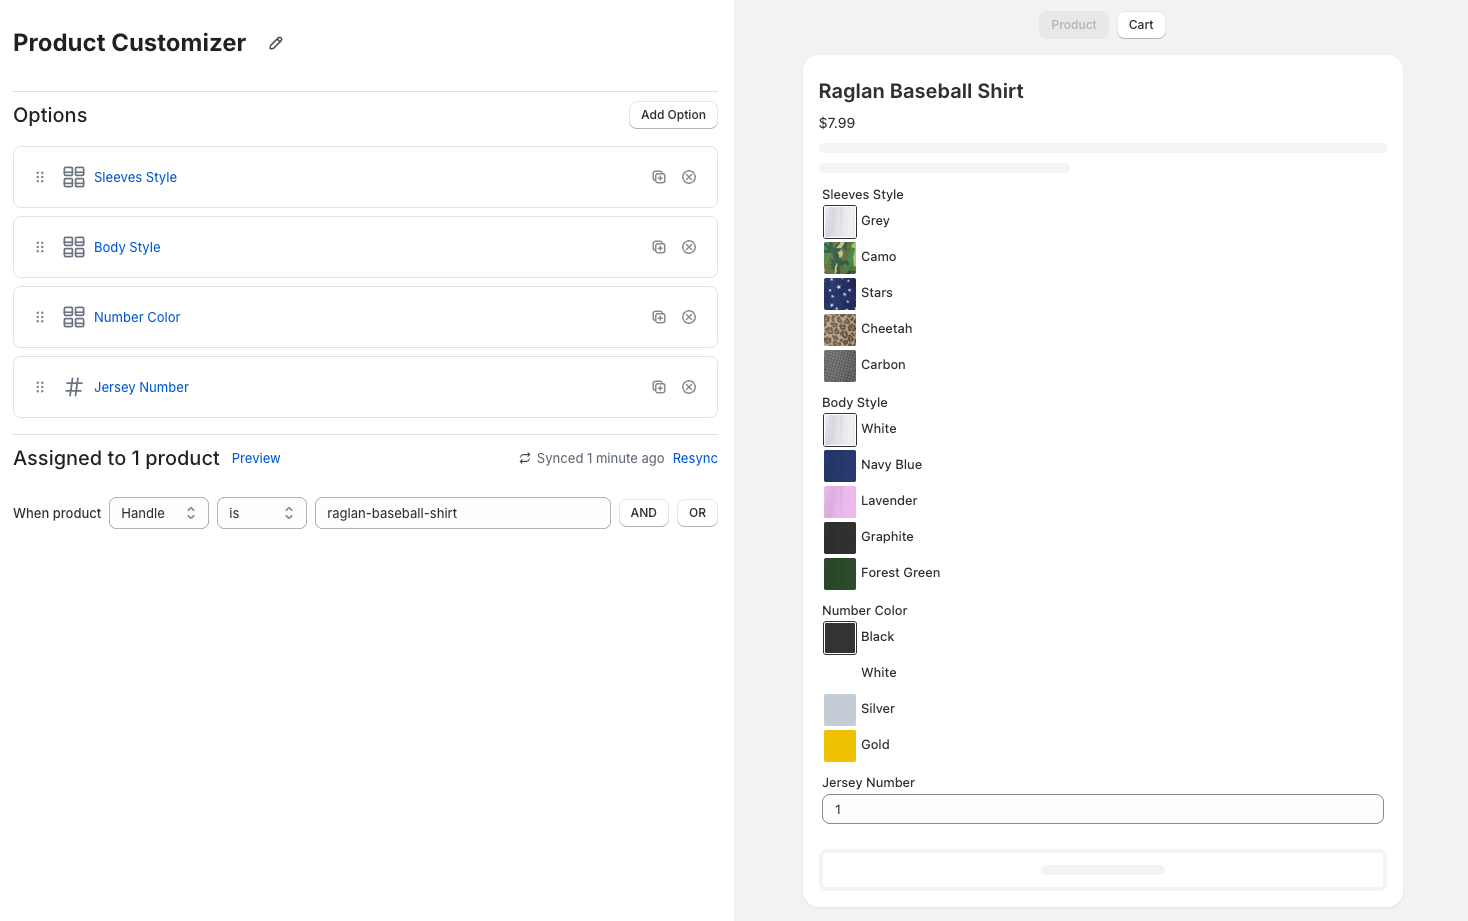
Open the raglan baseball shirt and try the options. Four Infinite Options fields drive the picture:
- Sleeves Style (Grey, Camo, Stars, Cheetah, Carbon), swatches that swap the sleeve artwork.
- Body Style (White, Navy Blue, Lavender, Graphite, Forest Green), swatches that swap the body color.
- Number Color (Black, White, Silver, Gold), which recolors the number.
- Jersey Number, a number field. Whatever the shopper types is drawn on the chest as they type it.
Every combination comes from the same 9 image files and one line of SVG text. Nobody photographed 100 shirts.
How the layered preview works
The preview has three kinds of pieces, stacked in one box the size of the product photo:
- The base photo. The product with its default choices (in the demo, a white body and grey sleeves). It's the only layer that's always visible.
- Image layers. One transparent PNG per choice that changes the look: a body file for each body color, a sleeve file for each sleeve pattern. Each file contains only its part of the shirt, and the rest of the canvas is empty. Showing one of them covers that part of the base photo.
- A text layer. An SVG with a single
<text>element for anything the shopper types. Because it's real text, it can show any number or name without an image for each one.
A small script listens to Infinite Options. When the shopper picks "Camo" sleeves, it hides every sleeve layer and shows sleeves-camo.png. When they type 23, it sets the SVG text to 23. The browser does the compositing.
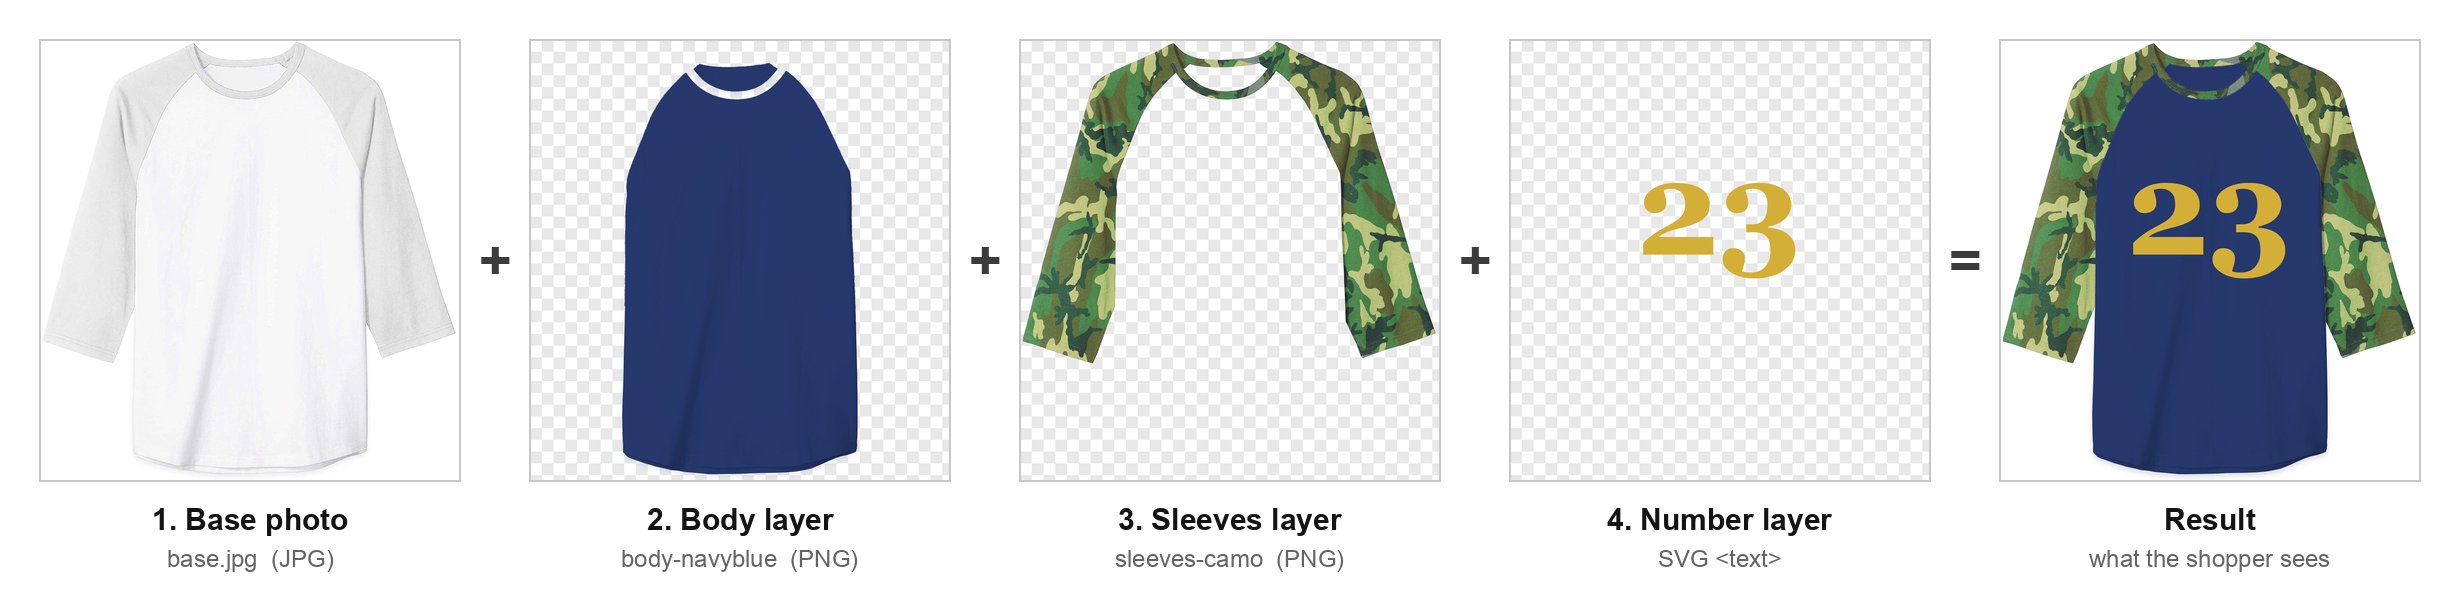
The whole trick is in that caption. Every layer, and the SVG's coordinate system, uses the exact same canvas as the base photo. That's what makes the result look like one photo instead of stickers on a shirt.
What you need before you start
- Infinite Options installed and turned on for your theme.
- Your options planned: which choices change the picture, and which don't (size, for example, doesn't need a layer).
- A product photo shot straight on, on a plain background, in the default choices.
- Someone who can work in Photoshop, Figma, Affinity or a similar tool with layers and masks.
- Access to edit your theme, ideally on a duplicate theme you can preview before publishing.
Step 1: Make the artwork (the hard part)
Most customizer projects that look fake fail here, not in the code. Do these in order.
Start from one master file at one size
Pick a canvas size and never change it. The demo uses 1426 x 1500 pixels for everything. Put the base photo in a master file at that size, and build every layer in the same file, on top of it, so each one is drawn in place. Export each layer from that file with the full canvas, not trimmed to its contents. A sleeve PNG is 1426 x 1500 even though the sleeves fill only part of it.
If one file is trimmed, scaled or nudged by a few pixels on export, its edges won't line up with the base and you'll see a halo or a gap. Turn off any "trim transparent pixels" or "crop to content" option in your export settings.
Cut a clean mask for each part
Each changeable part (body, sleeves, collar, logo area) needs a precise mask that follows the edge of that part on the base photo. Make the mask once, save it, and reuse it for every color or pattern of that part. That way all the sleeve files have exactly the same outline, and swapping between them never shifts an edge.
Decide where parts overlap and which one wins. In the demo the sleeves sit on top of the body, so the sleeve mask includes the shoulder seam and the body mask can be a little generous underneath it.
Keep the folds and shading
A flat fill of navy over the body looks like a cutout. To keep the fabric looking real, put the new color or pattern on the part and blend it with the base photo's shading (a multiply or luminosity blend over a light base usually works), then flatten that part into its own PNG. Shoot the base product in white or a light color: it's much easier to darken a light garment convincingly than to lighten a dark one.
Patterns like camo or stars should follow the shape of the part. A displacement map or a warp in your design tool helps them bend around the arm instead of looking printed on glass.
Leave the defaults in the base photo
The default choices don't need a layer. In the demo, White body and Grey sleeves are what the base photo already shows, so there's no body-white.png or sleeves-grey.png. When the shopper picks White, the script hides every body layer and the base shows through. One fewer file per option, and the default view loads fastest.
Name files after the option values
Name each file <group>-<value>.png, with the value lowercased and spaces removed: body-navyblue.png, body-forestgreen.png, sleeves-camo.png. Then the script can turn the shopper's choice ("Navy Blue") into a file name with no lookup table, and adding a new color later is just one more file with the right name.
Keep the files small
Every layer loads with the page, so file size matters. Export PNGs with transparency (PNG-24 with alpha), run them through a compressor such as TinyPNG or Squoosh, and save the base photo as a JPG since it has no transparency. In the demo the base is a JPG and the layers are PNGs. Around 1,500 pixels on the long side is plenty for a product image.
Test the stack before you touch the theme
Before uploading anything, stack the exported files back on top of the base in a new document, with no positioning, and flip through every combination. If an edge is off there, it will be off on the site too. It's much faster to fix in the design tool.
Step 2: Create the options in Infinite Options
In Infinite Options, create an option set for the product with one field per choice. For the demo:
- Sleeves Style: a Swatch field with Grey, Camo, Stars, Cheetah and Carbon.
- Body Style (Label on Cart: Body): a Swatch field with White, Navy Blue, Lavender, Graphite and Forest Green.
- Number Color: a Swatch field with Black, White, Silver and Gold.
- Jersey Number: a Number field, with a minimum and maximum so nobody orders number 4,000.
Each option has two names in Infinite Options: Label on Product, which shoppers see, and Label on Cart, which is saved on the order and is the name the script receives. They can differ. In the demo, shoppers see "Body Style" but the Label on Cart is "Body", so the script listens for "Body". Write down the exact Label on Cart for each field; "Sleeves Style" in the app has to be "Sleeves Style" in the code. Swatch images can be small crops of the pattern itself, so the shopper sees camo on the button and on the shirt.
Make the first value of each visual field the one the base photo already shows (White, Grey). Before the shopper picks anything, the preview is the base photo, so it already matches.
Every field is saved on the order as a line item property, so you get "Sleeves Style: Camo, Body: Navy Blue, Number Color: Gold, Jersey Number: 23" on the order whether or not the preview is working. If you're new to how that works, our guide to line item properties covers where they show up.
Step 3: Upload the layers to Shopify
In your Shopify admin, go to Content > Files and upload the base photo, every layer PNG and, if you use one, the font file for the text layer. Keep the file names exactly as you exported them. Shopify's file_url Liquid filter finds a file by name, so the theme code can refer to body-navyblue.png directly.
The demo uploads its layers to the product's own media and tags them by alt text instead. That works, but the layers then show up in the product gallery, in Google Shopping feeds and anywhere else the theme lists product images, unless you filter them out everywhere. Content > Files keeps them out of the way.
Step 4: Add the preview stack to the product page
Use a separate product template so only your customizable products get the preview. In the theme editor, create a new product template (for example customizer), assign it to the jersey under Theme template on the product page, and in that template:
- Hide or remove the theme's own product media block, so you don't show two pictures.
- Add a Custom Liquid block where the image should go, and paste the stack below into it.
{% comment %}
  Live preview stack for the jersey customizer.
  Layer files live in Content > Files.
{% endcomment %}
{% assign bodies = 'navyblue,lavender,graphite,forestgreen' | split: ',' %}
{% assign sleeves = 'camo,stars,cheetah,carbon' | split: ',' %}

<div class="io-preview">
  <img class="io-preview__base"
       src="{{ 'jersey-base.jpg' | file_url }}"
       width="1426" height="1500"
       alt="{{ product.title | escape }} preview">

  {% for value in bodies %}
    <img class="io-layer" data-group="body" data-value="{{ value }}"
         src="{{ 'body-' | append: value | append: '.png' | file_url }}"
         width="1426" height="1500" alt="">
  {% endfor %}

  {% for value in sleeves %}
    <img class="io-layer" data-group="sleeves" data-value="{{ value }}"
         src="{{ 'sleeves-' | append: value | append: '.png' | file_url }}"
         width="1426" height="1500" alt="">
  {% endfor %}

  <svg class="io-number" viewBox="0 0 1426 1500" aria-hidden="true">
    <text id="io-number" x="713" y="730" text-anchor="middle"
          font-size="450" fill="#111111">1</text>
  </svg>
</div>
The order of the elements is the stacking order: base first, then the body layers, then the sleeves, so sleeves cover the body where they meet, then the number on top. If your parts overlap differently, change the order.
Add the CSS to the same Custom Liquid block inside a <style> tag, or to your theme's CSS file:
@font-face {
  font-family: "Jersey";
  src: url("{{ 'jersey-font.woff2' | file_url }}") format("woff2");
}

.io-preview {
  position: relative;
}

.io-preview img,
.io-preview svg {
  display: block;
  width: 100%;
  height: auto;
}

.io-layer,
.io-number {
  position: absolute;
  inset: 0;
  height: 100% !important;
  pointer-events: none;
}

.io-layer {
  opacity: 0;
}

.io-layer.is-on {
  opacity: 1;
}

.io-number text {
  font-family: "Jersey", sans-serif;
}
Layers are hidden with opacity rather than display: none. The browser loads every layer when the page opens, so swapping is instant instead of waiting for a download on the first click.
The width and height attributes on every image are the canvas size. They let the browser reserve the right space before the images load, so the page doesn't jump.
Step 5: Line up the text layer
The SVG is what makes typed text work. Three details make it line up:
- The
viewBoxis the canvas size (0 0 1426 1500). SVG coordinates are then the same as pixel coordinates in your master file, and the SVG scales with the photo at every screen size. xandycome from the master file. Find the spot on the base photo where the center of the text's baseline should sit and copy those pixel coordinates.text-anchor="middle"centers the text onx, so 1, 23 and 88 all stay centered on the chest.font-sizeis in canvas pixels too. 450 here means 450 pixels tall on the 1,500 pixel canvas, not 450 pixels on screen.
Use the real production font. Upload the font file to Content > Files and load it with @font-face as in the CSS above, or the preview falls back to a default font that won't match what you print. Check the font's license allows web embedding.
Flat text on a flat SVG doesn't follow fabric folds. On a chest number that's barely noticeable. For text on a curved or angled surface (a mug, a bottle, a sleeve), a dedicated customizer app that warps text will look better.
Step 6: Connect Infinite Options to the preview
Infinite Options has a JavaScript Event API. If your theme defines window.Shoppad.apps.infiniteoptions.beforeReady, the app calls it when it loads and passes a subscribe function. Two events matter here:
fieldLoadfires once for each field when it's added to the page, with the field's starting value.fieldChangefires every time the shopper changes a field, including each keystroke in a text or number field.
Both give you event.detail.name (the field's Label on Cart) and event.detail.value (the chosen value). Add this script to the same Custom Liquid block, after the stack:
<script>
  window.Shoppad = window.Shoppad || {};
  window.Shoppad.apps = window.Shoppad.apps || {};
  window.Shoppad.apps.infiniteoptions = window.Shoppad.apps.infiniteoptions || {};

  window.Shoppad.apps.infiniteoptions.beforeReady = function (subscribe) {
    // Label on Cart -> data-group on the layer images
    var layerGroups = {
      'Body': 'body',
      'Sleeves Style': 'sleeves'
    };

    // Option values -> the exact colors to draw the number in
    var numberColors = {
      'Black': '#111111',
      'White': '#ffffff',
      'Silver': '#c0c0c0',
      'Gold': '#d4af37'
    };

    // "Navy Blue" -> "navyblue", to match the file names
    function slug(value) {
      return String(value || '').toLowerCase().replace(/[^a-z0-9]/g, '');
    }

    function updatePreview(name, value) {
      var group = layerGroups[name];
      if (group) {
        document.querySelectorAll('.io-layer[data-group="' + group + '"]')
          .forEach(function (img) {
            img.classList.toggle('is-on', img.dataset.value === slug(value));
          });
      }

      var number = document.getElementById('io-number');
      if (!number) return;
      if (name === 'Jersey Number') {
        number.textContent = value || '';
      }
      if (name === 'Number Color') {
        number.setAttribute('fill', numberColors[value] || '#111111');
      }
    }

    // fieldLoad: set the preview from each field's starting value
    subscribe('fieldLoad', function (event) {
      updatePreview(event.detail.name, event.detail.value);
    });

    // fieldChange: update it every time the shopper picks something
    subscribe('fieldChange', function (event) {
      updatePreview(event.detail.name, event.detail.value);
    });
  };
</script>
To adapt it to your product, change three things: the Label on Cart names in layerGroups, the color values in numberColors, and the text field name (Jersey Number). The Event API documentation lists the other events, such as fieldShow and fieldHide for options with conditional logic. Using a color map instead of the option name lets "Gold" be your exact brand gold instead of the browser's idea of gold.
The script has to be on the page before Infinite Options loads, which it will be in a Custom Liquid block. If your theme already defines beforeReady for another customization, add these subscriptions inside the existing function rather than defining a second one, because the second definition replaces the first.
Step 7: Test every combination
Preview the duplicate theme and check:
- Every value of every visual field. A typo in one file name, or a script name that doesn't match the Label on Cart, means a choice silently shows the base photo.
- Edges at full size. Zoom in on seams and outlines on a large screen. Halos and gaps are easier to spot there than on a phone.
- Mobile. The stack should scale as one picture. If the number drifts away from the chest at small widths, the SVG isn't filling the same box as the images; check the CSS.
- The text field limits. Try the longest allowed value. Three digits at the demo's font size are wider than two, so set the field's maximum to what fits.
- A test order. Add to cart and confirm every choice is on the cart line and the order as a property.
- Page speed. Every layer loads up front. With 4 options of 5 values that's a manageable number of files. With dozens of values per field, consider loading layers only after the shopper first interacts.
What reaches the order (and what doesn't)
The preview lives only in the browser. Shopify saves the choices, not the picture: your order shows the line item properties, and your production team builds from those. That's usually what you want, since a property like "Jersey Number: 23" is unambiguous to a printer.
If you need the image itself on the order, for example to send a mockup to a print supplier, that's beyond what this setup does. Either send a proof after the order (common for high-value items) or use a customizer app that renders and saves a file. Our guide to product personalization covers proofs and production workflows.
The preview also needs care when you change themes. The template, Custom Liquid block and script live in the theme, so switching to a new theme means adding them again. Keep a copy of all three. Our article on changing your Shopify theme has the full checklist.
When to use a configurator app instead
This approach is a great fit for a handful of products with a few visual choices each, where you want full control over how it looks and already use Infinite Options for the order details. It gets heavy when:
- You have many products, each needing its own artwork and template.
- Choices multiply: several overlapping parts with many colors each, or parts that are added and removed.
- Shoppers upload their own photos or logos and need to position them on the product.
- Text has to wrap around a curved surface or you need multiple camera angles.
For those, a dedicated configurator app is worth its higher price. We compare the options in product configurator vs product options app.
Getting help with the build
Infinite Options support can help you set up the option set and get the app showing on your theme. The image layers, template and script are custom work on your theme, so they're outside what app support covers. If you'd rather not build it yourself, a Shopify developer can usually wire up the code in a few hours once the artwork is ready, and this article is a good brief to hand them.
FAQs
Can Infinite Options change the product image when a shopper picks an option?
Not on its own. Infinite Options collects the choices and adds them to the order, and its Events API tells your theme when a choice changes. A short script in your theme listens to those events and shows the matching image layer, which is how the raglan shirt demo works.
Do I need a separate image for every combination?
No. You need one transparent layer per choice, not per combination. The demo covers 25 sleeve and body combinations, in any number and color, with one base photo and 8 layers. The default choices are already in the base photo, so they need no layer at all.
Why do my layers not line up with the product photo?
Almost always because a layer was exported at a different size than the base, or trimmed to its contents. Every layer must be exported at the full canvas size from the same master file, and every image in the stack must be set to the same width and height.
Can the preview show text the shopper types?
Yes. Put an SVG over the photo with the same viewBox as the image size and a <text> element, then update its text on each fieldChange event from the text or number field. Load your production font with @font-face so the preview matches what you make.
Is the preview image saved on the order?
No. The order gets each choice as a line item property, for example "Body: Navy Blue", but not a picture. If you need an image file for production, send a proof after the order or use a customizer app that generates one.