How to let customers upload files on Shopify product pages

Short answer
To let customers upload files on Shopify product pages, add an upload field to the product form so the file travels with the item into the cart and onto the order. You can do it with a few lines of Liquid, a product options app, or a dedicated upload app like Uploadery.
A dedicated upload app adds what the other two don't: Uploadery has image preview, cropping, file type and size rules, and links to every file on the order.
This guide is about customers sending you files with an order: a logo, a photo to print, a design proof. If you want to upload your own images and PDFs to your store, that is Content > Files in your Shopify admin, and not what we cover here.
The no-app method: a file input in the product form
Shopify can attach a file to a cart line as a line item property. You add a file input named properties[Something] inside the product form. Shopify's {% form 'product' %} tag already submits as multipart/form-data, which is what lets the browser send the file itself and not just its name. A minimal version looks like this:
{% form 'product', product %}
  <!-- your theme's variant picker, quantity and buttons stay as they are -->

  <p>
    <label for="customer-file">Upload your photo</label>
    <input type="file" id="customer-file" name="properties[Photo]" accept="image/png,image/jpeg">
  </p>
{% endform %}
The text inside the brackets becomes the property name on the order. When the customer adds to cart, the file is attached to that line and your order admin shows a link to it. Make a backup copy of your theme before you edit it, and place a real test order before you rely on it, because themes that add to cart with JavaScript don't all handle files the same way.
For one product that occasionally needs a file, this can be enough.
Where the no-app method falls short
File uploads are the roughest part of hand-coded line item properties. The problems merchants run into:
- No preview. The customer sees a file name, not their image. They can't tell they picked the blurry version until the product arrives.
- Little control over size and type. The
acceptattribute filters the file picker, but customers can usually get around it, and there is no clean way to set a maximum file size or a minimum image size. - Awkward on mobile. A bare file input looks different in every phone browser, and large camera photos upload with no progress shown.
- Switching themes loses it. A different theme starts from its own files, so you re-apply the edit every time, and a theme update can drop it if it conflicts with the new version (see how to change your Shopify theme without breaking your apps).
- Quick add skips it. Quick add buttons on collection pages and quick view popups often add the item without loading the product form, so the order arrives with no file at all, even if you marked the input required.
- Nothing after checkout. Your team still has to dig the file out of each order, and the default notifications and packing slips won't show it unless you edit those templates too.
Your options: an options app or an upload app
A file input in a product options app
Many product options apps include a file upload input next to their text fields, dropdowns and swatches. We make Infinite Options, and it has one. It suits products where the upload is one choice among many, like a custom T-shirt with size, print position and a text line, all in one option set. Infinite Options starts at $12.99/month with a 14-day free trial (as of October 2026). For comparing options apps in general, see Shopify product options apps compared.
A dedicated upload app
If the file is the point of the product (photo prints, custom logos on merchandise, printed artwork, documents for a service), a dedicated upload app gives you more control over what customers send and what your team receives. That is what we built Uploadery for. Other upload apps exist on the App Store too; whichever you try, check it against the list below.
What Uploadery adds
Uploadery (listed as File Upload by Uploadery) adds upload fields to your product pages and attaches each file to the order. It is Built for Shopify and rated 4.6 (179 reviews) on the App Store. What it does that a bare file input doesn't:
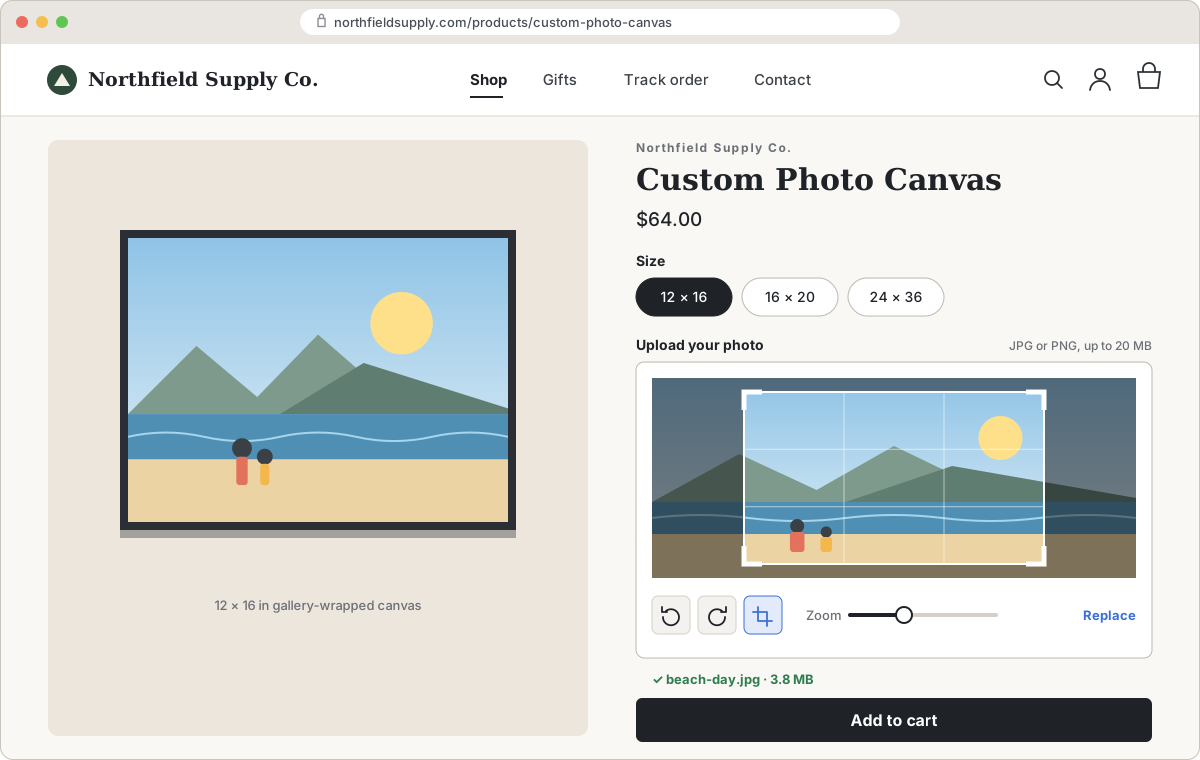
- Preview, crop and rotate. Customers see their image after uploading and can crop or rotate it before adding to cart.
- Per-field file types. Any file type works, and each field can allow only the ones you want, such as PNG, JPEG, PDF, PSD, AI or ZIP.
- Maximum file size per field.
- Image dimensions. Set a minimum and maximum width and height in pixels. If a customer picks an image outside those limits, they see an error and choose another file.
- Files linked on the order. Each upload is saved as a line item property holding a link to the file, so it shows on the order in your Shopify admin.
- Image preview in the cart and on the product page, so customers can check what they're ordering (cart preview setup).
- Links in notifications and packing slips, so the file is one click away for whoever makes the product (notification setup).
- Fields assigned by rules, with exclusions, so you don't set up each product by hand.
Plans, as of October 2026: Professional is $9.99/month for files up to 50MB, with 100GB of storage, unlimited uploads and no order limits. The 100MB plan is $19.99/month (files up to 100MB) and the 2GB plan is $59.99/month (files up to 2GB). Every plan has a 14-day free trial. Uploadery also works with Infinite Options, Shopify Flow and MESA. With Infinite Options, a choice like "Add your logo? Yes" can reveal the upload field (how that works).
To be clear about what it doesn't do: Uploadery checks file type, file size and image dimensions. It doesn't check DPI or color mode, and it doesn't create proofs. If you print, you still review files before production.
Setting up Uploadery, step by step
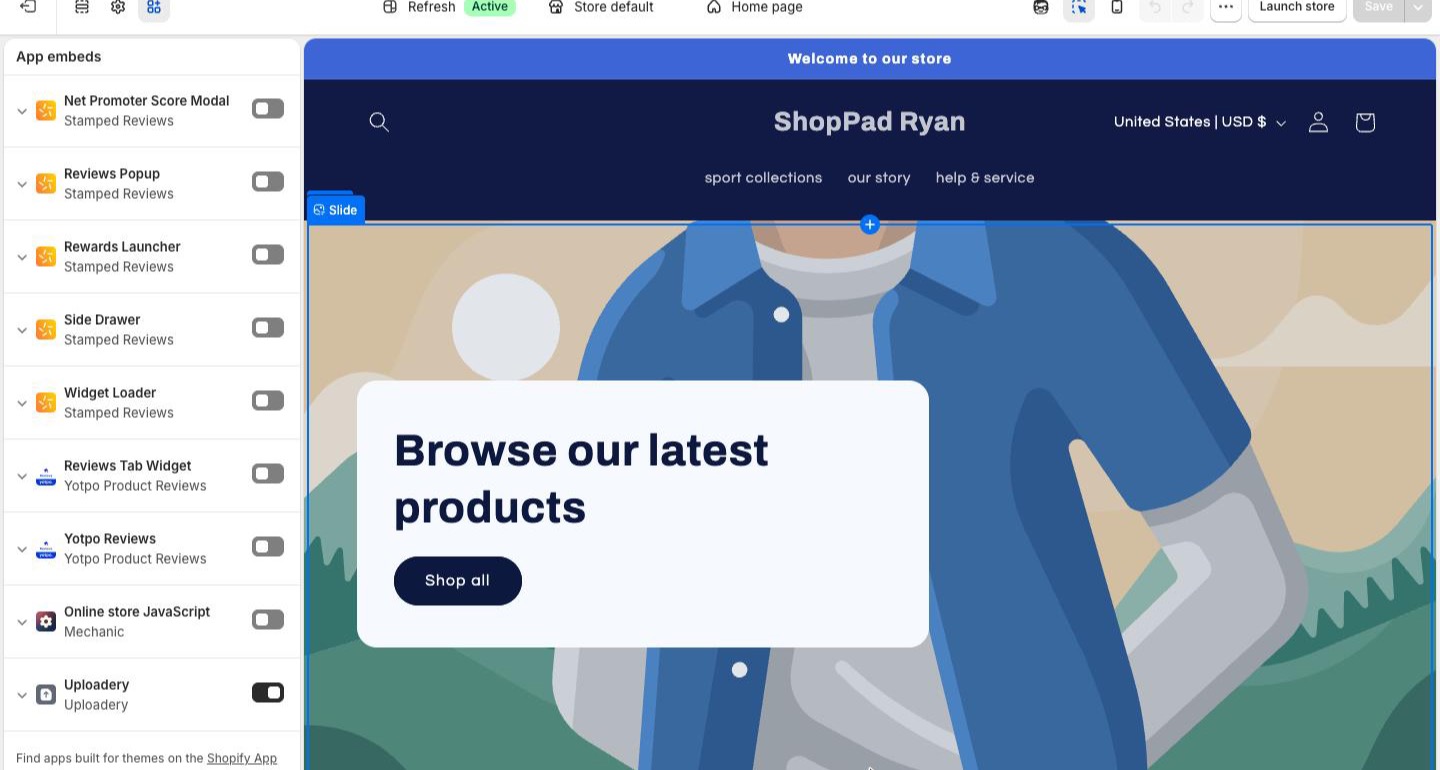
- Install the app and turn on the app embed. In your Shopify admin, go to Online Store > Themes > Customize, open the App embeds panel, switch on Uploadery and click Save. Upload fields then appear above the Add to cart button. Per our install guide, this only needs doing once per theme.
- Optionally, add the app block. If you want the field somewhere specific, add the Uploadery Fields block to your product template in the theme editor and drag it into place. Use one block per template.
- Create an upload field. In Uploadery, give the field a label customers will understand ("Upload your logo"), then set allowed file types, maximum file size and, for images, the minimum and maximum dimensions.
- Assign it to products. Use rules to apply the field to the right products, and exclude a few if needed.
- Place a test order. Upload a file on your phone and on a computer, check the cart, then open the order in admin and click the file link. Check your order confirmation and packing slip too.
If the field doesn't appear, the app embed is almost always the cause, especially after a theme change. It is the most common question we get across our apps. Our guide to why app options or upload fields don't show on your theme walks through the checks.
What to decide before you go live
These decisions matter more than the app:
- Which file types. Accept only what you can use. A print shop might want PDF, AI and high-resolution PNG; a photo gift store only needs JPEG and PNG.
- Size limits. Set a maximum that fits your plan and your production tools, and a minimum image size so tiny images get caught before checkout instead of after.
- Required or optional. If the product can't be made without a file, make the field required. If it's an optional extra, like adding a logo, show the field only when the customer chooses it.
- One upload or several. A photo collage needs several fields; a multi-pack where each item gets its own image needs one field per item. For logos and artwork in particular, see letting customers upload a logo or artwork for custom products.
- Where your team gets the file. Decide whether production works from the order in admin, the packing slip or the order notification email, and make sure the file link shows up there.
- How long you keep files, and privacy. Customers may upload photos of people, including children. Decide how long you need files, delete what you no longer need, and say in your privacy policy that you collect uploaded files, what you use them for and how long you keep them.
Which route to pick
- An occasional file on one or two products, and you're comfortable editing Liquid: the no-app file input.
- The upload is one choice among many on a customizable product: the file input in an options app like Infinite Options.
- The file is central to the order, you need preview, size or dimension rules, or larger files: a dedicated upload app like Uploadery.
For engraving and custom text without files, see Shopify product personalization.
FAQs
Can customers upload files on Shopify without an app?
Yes. Add a file input named properties[Name] inside your theme's product form (Shopify's product form already submits as multipart/form-data, which file uploads need). The file is attached to the order as a line item property. There is no preview or size control, and the edit has to be redone when you change themes.
Where do customer uploads show up in Shopify?
Uploaded files appear as a link on the line item of the order in your Shopify admin. With an app like Uploadery, the link can also be added to order notifications and packing slips, and an image preview can be shown in the cart.
Is this the same as Content > Files in Shopify?
No. Content > Files is where merchants upload their own images, videos and documents to use around the store. Customer uploads are files customers send with an order from the product page, and they are attached to that order.
Why is my upload field not showing on the product page?
For app-based upload fields, the usual cause is the app embed being off in the theme you're using, often after a theme change. Turn it on under Online Store > Themes > Customize > App embeds and click Save. Also check the field is assigned to that product.
How big can customer uploads be?
With Uploadery, the Professional plan ($9.99/month) allows files up to 50MB, the 100MB plan ($19.99/month) up to 100MB and the 2GB plan ($59.99/month) up to 2GB, as of October 2026. You can also set a lower maximum on each upload field.